
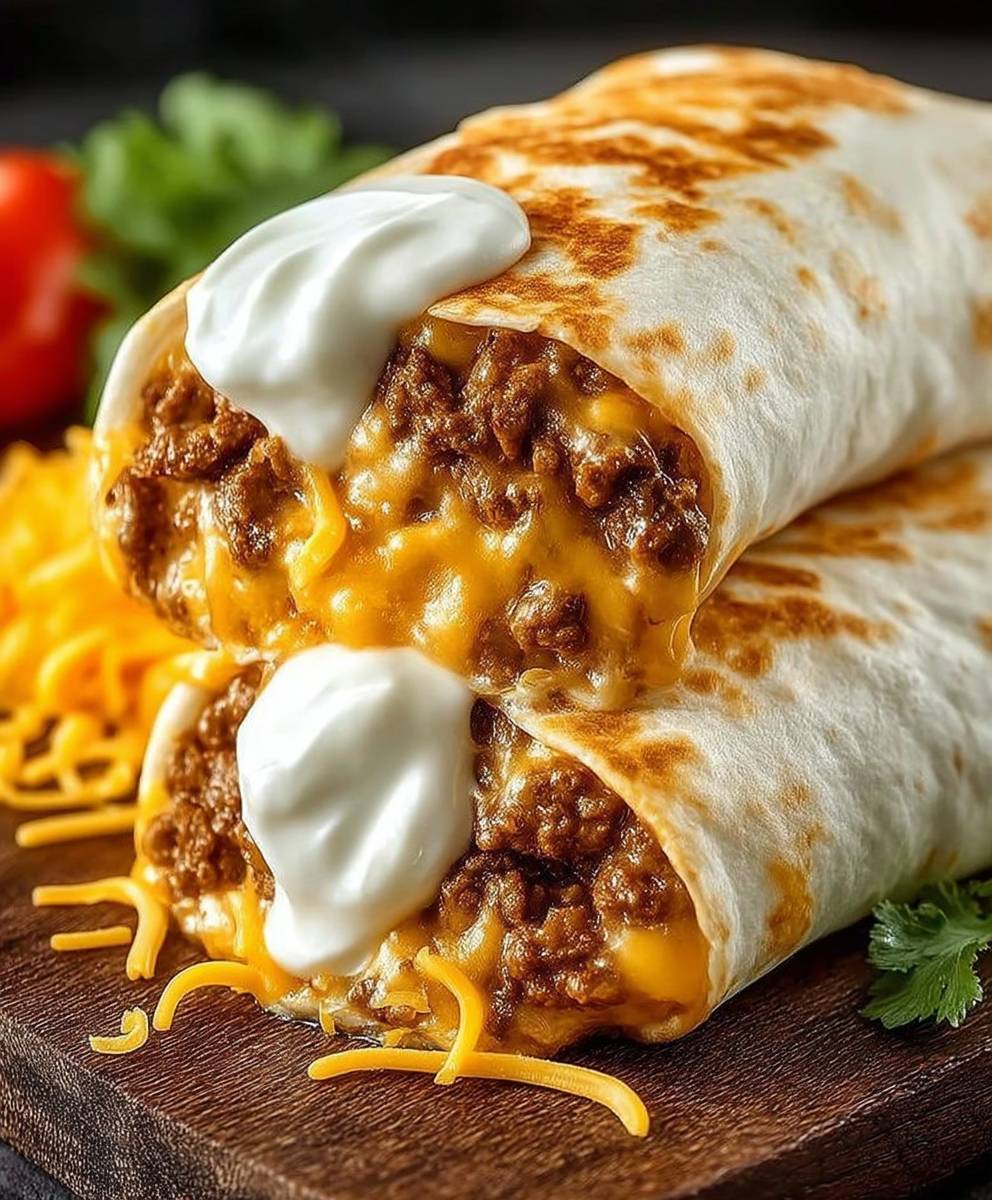
The aroma of seasoned beef and melted cheese wrapping around you—that is true culinary bliss. Skip the fast-food run; you deserve the absolute best. Today, we conquer the kitchen with the supremely satisfyingEasy Homemade Beefy Melt Burritos. These hearty handheld meals banish complicated dinner stress instantly. They deliver maximum flavor with minimal effort, transforming basic ingredients into a cheesy, savory powerhouse that will make everyone ask for seconds.
- These beefy wraps come together in under 30 minutes, making them the ultimate solution for those crazy weeknights when time seems to vanish instantly.
- The intense, savory flavor profile of the seasoned ground beef filling, enhanced by a hint of tanginess, guarantees a truly memorable eating experience.
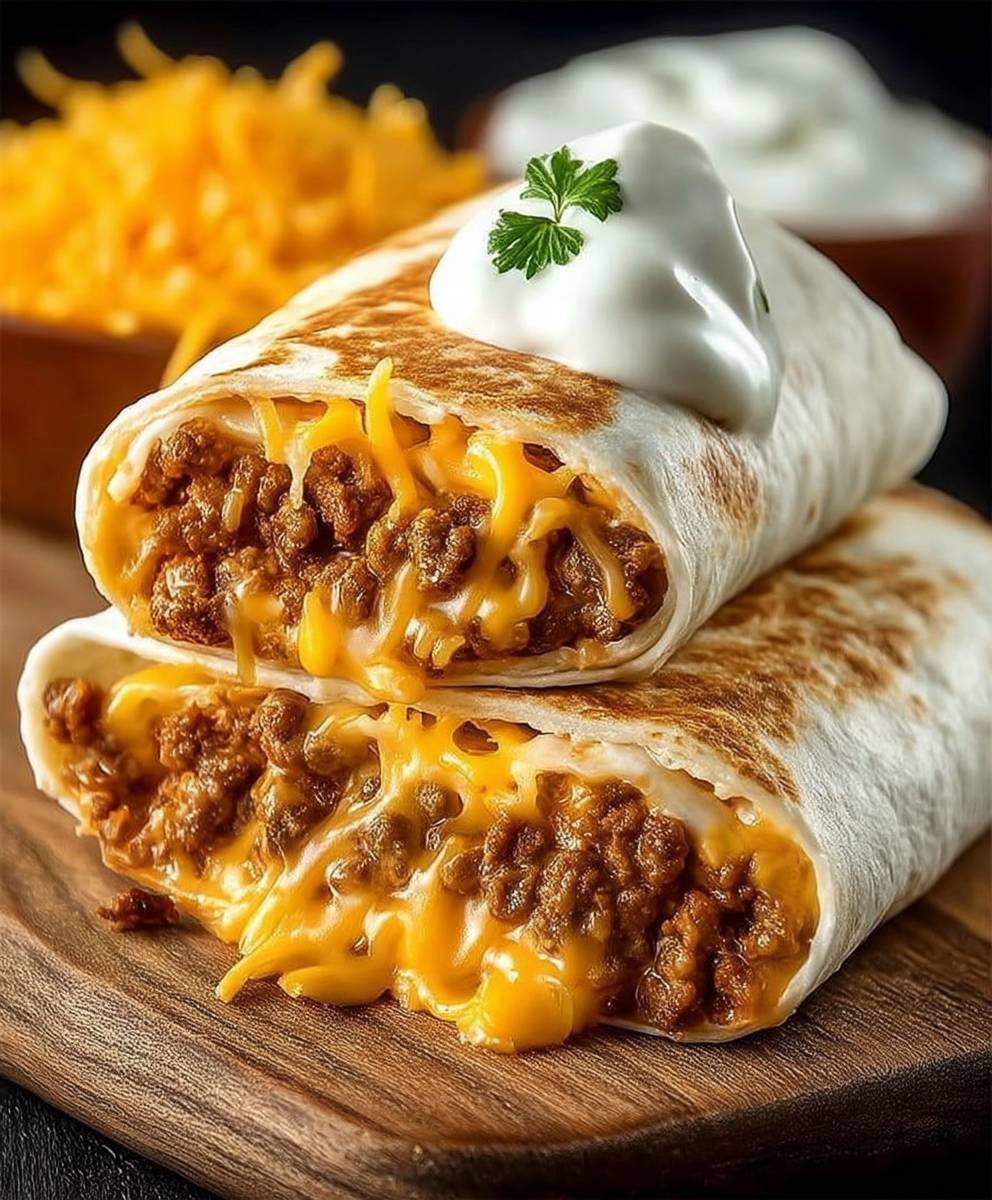
- Achieve that perfect golden, crispy exterior and a gorgeously gooey, melted interior, elevating a simple burrito to peak comfort food status.
- They are incredibly versatile, offering easy customization options for spice level or added vegetables, and they freeze beautifully for meal prepping convenience.
Why These Easy Homemade Beefy Melt Burritos Are Your New Weeknight Hero
I once attempted to curb a massive craving for a cheesy, beefy pocket of goodness at a certain drive-thru, and I ended up with a tortilla so soggy it required surgical intervention just to lift it off the wrapper. That traumatic culinary event was the turning point. I realized if I wanted that perfectly crispy, flavor-packed, cheese-laden handheld meal—the kind where the cheese stretches just right—I had to master the craft myself. This recipe forEasy Homemade Beefy Melt Burritosisn’t just a meal; it’s a declaration of independence from sub-par takeout.
We focus heavily on building layers of flavor into the ground beef, ensuring every bite is rich, savory, and perfectly seasoned, rather than tasting like boiled meat slathered with mild sauce. This method transforms simple ground beef into a robust, deeply satisfying filling that stands up perfectly to the accompanying cheese and sauce. It’s comforting, it’s quick, and it hits that sweet spot between satisfying family dinner and indulgent midnight snack. Plus, they are incredibly cost-effective, turning simple pantry staples into a feast, which is a major win for the weekly grocery budget.
The Secret to that Irresistible “Melt”
The success of a great melt burrito doesn’t just rely on how much cheese you use; it depends entirely on choosing the *right* combination of cheeses and understanding how to apply them. We need two things working in tandem: excellent stretch and punchy flavor. I strongly recommend using a mixture of freshly grated Monterey Jack for its fantastic melt and stretch capabilities, coupled with some sharp cheddar for that necessary tang and richness. Pre-shredded cheeses often contain anti-caking agents that hinder a truly smooth melt, so grating your own ensures maximum goo factor.
The critical step many fast-food versions miss is integrating the cheese properly. We mix a portion of the cheese *into* the warm beef mixture just before rolling. This simple pre-melting step helps the filling bind together beautifully, preventing that heartbreaking moment when the cheese pulls out and leaves the beef stranded and dry. The rest of the cheese goes down as a foundational layer on the tortilla, guaranteeing a cheesy coat around the entire filling.
Customizing Your Beef Filling for Maximum Flavor
Do not feel confined to the basic beef and cheese setup, although the fundamental recipe is legendary and delicious on its own. These simple burritos are incredibly welcoming to extra flavors and textures. For example, add finely diced yellow onion and green bell peppers to the beef while browning it for extra texture, sweetness, and essential vitamins. This step takes just a few extra minutes and provides a great depth of flavor.
For those who prefer a deeper, smokier flavor, stir in a teaspoon of smoked paprika alongside the chili powder and cumin. If you want a creamy texture to the filling, stir in a spoonful of a thick Greek yogurt alternative or a non-dairy sour cream alternative just before wrapping. If you enjoy heat, a small amount of finely minced jalapeño or a swirl of green chili puree will elevate the flavor profile significantly. Remember, these cheesy beef wraps are a canvas for your culinary imagination, so feel free to experiment with your favorite seasonings and additions.
Ingredients for Easy Homemade Beefy Melt Burritos
Here’s what you’ll need to make this delicious dish:
- Ground Beef (85/15)Choose a quality ground beef blend for great flavor, ensuring some fat content remains to keep the filling juicy and moist during cooking.
- Large Flour TortillasOpt for burrito-sized tortillas (about 10 inches) that are pliable and strong enough to hold the generous filling without tearing during the rolling process.
- Monterey Jack CheeseThis cheese is essential for achieving the perfect stretch and melt, making the final burrito interior gooey and rich.
- Sharp Cheddar CheeseUse this cheese for a necessary flavor punch, balancing the mildness of the Monterey Jack and providing a distinct savory note.
- Beef BrothA splash of beef broth adds moisture and intensifies the meaty flavor of the filling, preventing it from drying out after seasoning.
- Tomato PasteThis highly concentrated paste adds depth and a subtle tangy sweetness, contributing to the overall complexity of the sauce.
- Spices (Chili Powder, Cumin, Garlic Powder, Onion Powder)These classic Tex-Mex spices form the foundation of the savory flavor profile, creating a warming and robust seasoning blend.
- Vegetable Oil or Cooking SprayNeeded for crisping the exterior of the burritos, ensuring a golden-brown, appealing shell that holds the shape well.
The full ingredients list, including measurements, is provided in the recipe card directly below.
How to Make Easy Homemade Beefy Melt Burritos
Follow these simple steps to prepare this delicious dish:
Step 1: Prepare the Seasoned Beef Filling
Brown the ground beef in a large skillet over medium-high heat, breaking it up into small pieces as it cooks. Once the beef is fully browned, drain off any excess fat from the pan thoroughly. Reduce the heat to medium. Add the tomato paste, stirring constantly for about one minute until the paste darkens slightly. Incorporate all the spices (chili powder, cumin, garlic powder, onion powder, salt, and pepper) and cook for another minute until fragrant.
Step 2: Simmer and Moisten the Filling
Pour in the beef broth and stir everything until the mixture is cohesive and slightly saucy. Let the mixture simmer gently for 5–7 minutes, allowing the flavors to marry and the liquid to reduce slightly, ensuring the filling is moist but not watery. Remove the skillet from the heat and stir in about a quarter of the total shredded cheese until it melts and binds the meat mixture together. This ensures a stable, gooey filling.
Step 3: Assemble the Burritos
Warm the tortillas briefly—either in the microwave for 15 seconds or over a dry hot skillet—to make them more pliable and prevent cracking. Lay a tortilla flat. Sprinkle a handful of the remaining shredded cheese mixture across the center line of the tortilla. Scoop a generous amount of the warm beef filling onto the cheese. Fold in the opposing sides of the tortilla inward, then fold the bottom edge up and over the filling, rolling tightly away from you until you achieve a neat, compact cylinder.
Step 4: Crisp the Exterior
Heat a clean, dry skillet or griddle over medium heat and lightly coat it with a little vegetable oil or cooking spray. Place the burritos seam-side down first into the hot pan. Cook for 3–4 minutes per side, pressing lightly with a spatula to ensure good contact with the pan, until they are beautifully golden brown and crispy on all sides and the interior cheese is fully melted and steaming hot.
Transfer to plates and serve immediately with a side of mild salsa or a dollop of thick yogurt alternative for the perfect finishing touch.
Meal Prepping and Freezing Tips for Burrito Bliss
These cheesy beef wraps are absolute superheroes when it comes to advance preparation, making your future self extremely grateful. You can prepare the entire batch of beef filling ahead of time, allow it to cool completely, and then store it in an airtight container in the fridge for up to four days. When you are ready to eat, simply reheat the filling, assemble the wraps quickly, and crisp them up in the skillet or air fryer.
For freezer storage, assemble the burritos completely using the method in Step 3, but do not cook or crisp them yet. To prevent freezer burn, wrap each burrito tightly first in parchment paper, then tightly again in aluminum foil. Place all wrapped burritos into a large freezer bag, squeezing out as much air as possible, and label the bag with the date. They keep well and maintain their quality for up to two months.
Reheating for Maximum Crispness
Never microwave a frozen burrito unless you actively enjoy a sad, rubbery, and somewhat damp tortilla experience. The optimal method for maximum crunch and flavor is always the oven or the air fryer. Preheat your oven to 375°F (190°C). Remove the frozen burrito from both the foil and the parchment paper. Place it directly on a baking sheet and bake for 25–30 minutes until heated through completely and the exterior is golden brown. If you are using an air fryer, set the temperature to 350°F (175°C) and cook for about 12–15 minutes, ensuring you flip the burrito halfway through. This technique consistently delivers a perfect, crunchy outer shell every single time.
Common Questions About Easy Homemade Beefy Melt Burritos
We have answered some of the most frequently asked questions about making the best melt-style burritos at home.
What is the best way to keep the burritos from getting soggy?
The key to avoiding sogginess is draining the ground beef mixture thoroughly after cooking and ensuring the filling is moist but not excessively wet before wrapping. Also, warming the tortillas slightly before filling helps seal the moisture inside the wrapper, and crisping them in a hot, dry skillet or air fryer immediately before serving creates a protective barrier.
Can I substitute the ground beef with other meats?
Absolutely. You can easily substitute the ground beef with ground turkey or ground chicken, though you may need to add a touch more oil or broth during the seasoning stage as these meats tend to be leaner and can dry out more quickly. The seasoning blend works beautifully with any ground meat.
What if my tortillas crack when I roll them?
If your tortillas are cracking, they are likely too cold or dry. To fix this, briefly warm them up. Stack the tortillas and wrap them in a slightly damp paper towel, then microwave them for about 15–20 seconds. This adds moisture and flexibility, making them much easier to fold neatly into theEasy Homemade Beefy Melt Burritosshape without tearing.
How can I make these simple homemade beef wraps spicier?
To increase the heat, add a pinch of cayenne pepper to your seasoning blend, or stir in a teaspoon of hot sauce or chipotle powder during the simmering stage. For fresh heat, place thin slices of raw or pickled jalapeño directly over the cheese layer before rolling.
There is a specific kind of hunger that hits around 6 PM on a Tuesday. It’s the kind that demands immediate satisfaction, usually involving a drive-thru window and a wrapper slightly greasy to the touch. We all know that specific craving: the cheap, comforting, deeply savory embrace of a cheesy beef burrito. But let me tell you, friends, achieving that drive-thru perfection in your own kitchen is not just possible—it’s ridiculously easy and exponentially better. We are talking about transcending the ordinary and creating the legendaryEasy Homemade Beefy Melt Burritos, a recipe so simple you’ll wonder why you ever waited in line.
Ingredients for the Ultimate Beefy Melt Experience
For the Seasoned Beef Filling
- 1 pound ground beef (85/15 ratio works best for moisture)
- 1 tablespoon olive oil
- 1 large yellow onion, finely diced
- 2 cloves garlic, minced
- 1 packet (or 3 tablespoons) high-quality taco seasoning
- 1/2 cup rich beef broth
- 1/4 cup tomato paste
- 1 teaspoon apple cider vinegar (adds necessary tang)
For Assembly and Melting
- 8 large flour tortillas (burrito size)
- 2 cups shredded Monterey Jack and Cheddar blend (the meltier, the better)
- 1/2 cup prepared refried beans (canned or homemade)
- Optional additions: diced green chilies, sour cream, or hot sauce
The Quest for the Golden Burrito: Instructions
We need speed and efficiency here, so put on your favorite upbeat cooking playlist. This recipe moves fast once the beef hits the pan, meaning minimal fuss and maximum flavor payoff. Preparing theseEasy Homemade Beefy Melt Burritosrequires focusing on building the filling flavor first, then transitioning smoothly into assembly.
Step 1: Building the Flavor Base
Heat the olive oil in a large skillet or Dutch oven over medium-high heat. Add the diced onion and sauté until softened and slightly caramelized, which usually takes about five minutes. Toss in the minced garlic and cook for just another minute until fragrant—don’t let that garlic burn, because that’s amateur hour and will spoil the whole batch!
Step 2: The Mighty Beef
Add the ground beef to the skillet. Break it up well using a wooden spoon, ensuring you crumble it finely. Cook the beef until it is thoroughly browned. This is a crucial moment: drain off any excess grease immediately. If you skip this necessary step, your burritos might end up soggy, and nobody wants a soggy burrito mess.
Step 3: Seasoning and Simmering for Depth
Sprinkle the taco seasoning evenly over the beef. Stir in the tomato paste until every piece of beef is coated in that savory red base. Now, pour in the beef broth and the apple cider vinegar. Bring the mixture to a low simmer, reduce the heat, and cook uncovered for about five to seven minutes. This essential simmering process concentrates the flavor, thickens the sauce slightly, and ensures the beef is incredibly juicy and tender.
Step 4: Warming the Wrappers
While the beef simmers down to perfection, make sure to warm your tortillas. Warm tortillas are necessary for flexibility, dramatically preventing tears and splits during the rolling process. You can use a microwave (30 seconds wrapped in a damp paper towel) or quickly heat them in a dry skillet over medium heat (about 15 seconds per side).
Step 5: Assembly Line Magic
Lay out a warmed tortilla on a clean surface. Spread a thin, even layer of refried beans down the center. Top the beans with a generous spoonful of the seasoned beef filling. Now, for the critical “melt” component: sprinkle a handful of the shredded cheese blend over the filling. Remember, we are crafting truly cheesyEasy Homemade Beefy Melt Burritos, so be generous with the shredded cheese!
Step 6: The Famous Fold
To roll a tight, secure burrito, first fold in the sides over the filling to contain it. Then, firmly fold the bottom edge up and over the filling, tucking it tightly against the contents. Roll forward until you reach the end, keeping the tension firm but gentle. Place the rolled burrito seam-side down on a baking sheet or plate while you finish the rest.
Step 7: The Grand Finale (Grilling for the Melt)
Heat a clean, dry skillet or a large grill pan over medium heat. This step is where the magic happens and the name truly comes to life. Place the burritos seam-side down in the hot pan. Cook for two to three minutes per side until they are beautifully golden brown, wonderfully crispy, and the cheese inside is gloriously melted and gooey. Serve immediately with your favorite toppings.
Why These Beefy Melts Beat the Takeout Line
The real secret to these burritos isn’t just the speed; it’s the high quality of the simmered beef. We aren’t just sprinkling generic spice on cooked meat; we are actively building layers of savory depth that truly make this recipe shine brighter than any drive-thru alternative. The addition of apple cider vinegar, while subtle, cuts through the expected richness of the ground beef and melted cheese, perfectly balancing the entire flavor profile. This meticulous attention to flavor is what separates homemade joy from fast food convenience.
Think about the last time you bought a quick burrito from a chain. Was the filling dry? Did the cheese seem lackluster, perhaps even flavorless? By making your own burritos at home, you gain absolute control over the essential moisture content, the seasoning intensity, and, most importantly, the melt factor. Utilizing a high-quality, flavorful cheese blend ensures that satisfying, creamy stretch and texture that elevates this simple dish from a basic snack to a truly memorable meal.
TheseEasy Homemade Beefy Melt Burritosare perfect for those who love efficient meal prepping. You can efficiently make a double batch of the rich beef filling on Sunday, store it safely, and assemble the burritos throughout the busy week as needed. A quick five-minute sear in a hot pan turns a speedy, no-fuss weeknight dinner into a gourmet experience, making weekday cooking genuinely enjoyable instead of feeling like a stressful chore.
Perfecting the Cooking Process
Achieve maximum flavor and efficiency by preparing the seasoned beef filling first; the simmering time allows you ample opportunity to warm the tortillas and set up your entire assembly station. Roll and grill the burritos right before you plan to serve them to ensure a satisfyingly crispy exterior and a wonderfully gooey, melted cheese center.
Add Your Touch
Swap out the milder Monterey Jack for pepper jack cheese to add a thrilling spicy kick to the melt. For an interesting textural change, stir in canned corn or black beans directly into the cooked beef mixture. If you want an even richer, deeper umami flavor, substitute the beef broth with a robust, flavorful chicken stock instead.
Storing & Reheating
Store fully cooled, un-grilled burritos wrapped individually and tightly in aluminum foil in the refrigerator for up to three days, or freeze them securely for up to one month. Reheat by baking at 375°F (190°C) for 15 minutes, or grill them until they are hot and perfectly crispy to maintain that essential texture.
I remember serving theseEasy Homemade Beefy Melt Burritosat a last-minute family movie night, and my niece—a famously picky eater—claimed they were better than any restaurant version, which is the highest culinary praise one can receive.
Chef’s Essential Tips for Burrito Success
- Always warm your tortillas slightly before rolling; cold tortillas crack easily and make a frustrating, messy assembly process inevitable, leading to leaks.
- Ensure you drain the excess fat after thoroughly browning the ground beef. Too much grease leads to soggy burritos that simply refuse to crisp up when grilled.
- Do not overfill the tortilla, even if you are strongly tempted! Aim for a tight, manageable roll that allows for easy folding and prevents blowouts during the heating stage.
Frequently Asked Questions About Burrito Perfection
Can I use ground turkey instead of ground beef for this recipe?
Absolutely! Ground turkey works wonderfully as a substitute, although it tends to be naturally leaner than beef. If you choose turkey, add an extra generous splash of beef broth or tomato sauce during the simmering step to maintain the filling’s essential moisture and prevent the dreaded dryness.
How do I keep my homemade burritos from unraveling during grilling?
The key to a sealed burrito is a combination of pressure and precise initial placement. Always place the rolled burrito seam-side down first on the hot, prepared skillet. This immediate heat helps instantly seal the fold, essentially gluing the tortilla shut with the melting cheese and residual cooking moisture, preventing it from bursting.
What is the best way to prevent the filling from becoming dry?
The combination of rich beef broth and concentrated tomato paste is your ultimate moisture safeguard in this recipe. Don’t aggressively cook the beef mixture down until it’s completely dry; it should still be slightly saucy and glossy when you remove it from the heat, as the tortilla will naturally absorb some of this necessary moisture upon assembly.
Are these burritos freezer friendly for future quick meals?
Yes, theseEasy Homemade Beefy Melt Burritosfreeze beautifully. Wrap them tightly in foil and then place them in a freezer bag. To reheat, remove the foil and bake them directly from frozen in a 400°F (200°C) oven until the center is piping hot, usually taking around 30 minutes.
Conclusion for Easy Homemade Beefy Melt Burritos
We have successfully navigated the culinary landscape, transforming humble pantry ingredients into the magnificent, satisfying Easy Homemade Beefy Melt Burritos. Remember, the ultimate secret lies in that perfectly seasoned, gooey center and the deeply satisfying crunch of the pan-crisped tortilla. This recipe consistently proves that exceptional, comforting food does not require overly complex techniques or endless hours of prep time. These burritos are the perfect solution for those hectic weeknights, spontaneous gatherings, or just satisfying a massive, urgent craving for something cheesy and utterly delicious. Go forth, roll your wraps with confidence, and embrace the glory of the beefy melt. Your happy taste buds—and your surprisingly easy weeknight schedule—will thank you profusely for making these simple beef burritos a permanent, celebrated fixture in your kitchen rotation.
Print
Easy Homemade Beefy Melt Burritos
- Total Time: 35 minutes
- Yield: 4 servings 1x
Description
Skip the drive-thru! These Beefy Melt Burritos deliver juicy, seasoned ground beef and melted cheese in minutes. Quick skillet prep makes weeknights easy.
Ingredients
- 1 pound ground beef (80/20 ratio recommended)
- 8 large flour tortillas (burrito size)
- 1 packet (1 ounce) taco seasoning mix
- 1/2 cup water
- 1 1/2 cups shredded sharp cheddar or Monterey Jack cheese
- 1 can (15 ounces) refried beans
- 1/4 cup sour cream
- 1 tablespoon vegetable oil
Instructions
- Step 1: Brown the beef: Heat the vegetable oil in a large skillet over medium-high heat. Add the ground beef and cook, breaking it up with a spoon, until fully browned. Drain off any excess grease thoroughly.
- Step 2: Season the filling: Stir the taco seasoning packet and 1/2 cup of water into the beef. Bring to a simmer and cook until the liquid has mostly reduced, about 5 minutes. Stir in the refried beans until thoroughly combined and heated through, then remove the mixture from the heat and stir in the sour cream.
- Step 3: Assemble the burritos: Warm the flour tortillas briefly (either in the microwave for 30 seconds or in a dry skillet) to make them pliable. Place a spoonful of the beef and bean mixture near the center of each tortilla, and top with about 2 tablespoons of shredded cheese.
- Step 4: Roll and seal: Fold in the sides of the tortilla, then tightly roll it up from the bottom edge to create a secure burrito. Repeat this process until all burritos are assembled.
- Step 5: Finish the melt: Heat a clean non-stick skillet over medium heat. Place the burritos seam-side down in the skillet and cook for 2-3 minutes per side until they are golden brown, lightly crispy, and the cheese has fully melted. Serve immediately.
Notes
- To prepare ahead, assemble the burritos completely but skip the final 'Finish the melt' step; wrap tightly in plastic wrap and freeze for up to 3 months.
- For frozen burritos, unwrap and microwave for 2-3 minutes to thaw, then finish in a medium-hot skillet or air fryer for 5 minutes per side until heated through and crispy.
- For a restaurant-style experience, serve these melts alongside a dollop of guacamole and a refreshing sprinkle of finely chopped fresh cilantro.
- To ensure your filling stays wonderfully creamy, always remove the beef and bean mixture from the heat completely before stirring in the sour cream.
- Prep Time: 15 minutes
- Cook Time: 20 minutes
- Method: Stovetop
- Cuisine: American
Nutrition
- Serving Size: 1 Burrito (approx. 180g)
- Calories: 390
- Sodium: 630mg
- Fat: 20.5g
- Saturated Fat: 8.5g
- Trans Fat: 0.2g
- Protein: 2g
FAQs
Diving into the world of Easy Homemade Beefy Melt Burritos naturally leads to questions about customization, prep time, and storage. We have compiled the most frequently asked queries to ensure your burrito-making experience is smooth, flavorful, and headache-free.
What are the best cheese and protein substitutions for these Easy Homemade Beefy Melt Burritos?
If you are looking to change things up, consider swapping the ground beef for ground turkey or shredded chicken. Both absorb the seasonings beautifully, offering a slightly lighter flavor profile. For the cheese, while cheddar is classic, Monterey Jack or pepper jack will add a satisfying gooey texture and a little kick. Ensure whatever cheese you use melts well and complements the smoky spices. You can also mix in some refried beans for an extra hearty filling, making your simple beef burritos even more substantial and flavorful while adding valuable fiber to the meal. This flexibility allows you to perfectly tailor these wraps to your family’s preferences.
Can I prepare the filling ahead of time and how should I store leftover burritos?
Absolutely! Preparing the savory beef filling a day or two in advance is a fantastic time-saver, perfect for those super busy weeknights when time is scarce. Store the cooled filling in an airtight container in the refrigerator to maintain freshness. When you are ready to assemble, just reheat the beef gently before spreading it onto your tortillas. Leftover finished burritos should be tightly wrapped in foil or plastic wrap and refrigerated for up to three days. For best results when reheating, use a dry skillet or a quick oven blast to crisp up the tortilla again, avoiding the microwave to keep them from becoming soggy.
Is it possible to freeze these beefy melt wraps for later consumption?
Freezing these burritos is highly recommended for efficient meal prepping, turning a single cooking session into multiple meals! Assemble the burritos fully, including the cheese, but skip the final step of crisping them in the pan. Wrap each burrito individually first in parchment paper, and then secure them tightly with aluminum foil to prevent freezer burn. They will last well in the freezer for up to three months without losing much flavor. When you are ready to eat, simply unwrap the foil and reheat the frozen burrito in the oven at 350°F (175°C) until thoroughly heated through, which usually takes about 30 to 40 minutes.
How can I easily adjust the spice level when making Easy Homemade Beefy Melt Burritos?
Customizing the heat is simple and depends entirely on your preference for fire! If you enjoy a milder flavor profile, stick strictly to mild chili powder and completely omit the cayenne pepper specified in the ingredients list. For those who like things spicy, increase the amount of cayenne slightly, or better yet, incorporate a dash of your favorite hot sauce directly into the beef mixture while it simmers to infuse the flavor deeply. Additionally, adding finely diced jalapeños or a spoonful of chipotle paste will give these cheesy beef wraps a smoky, intense heat that truly elevates the overall experience for chili enthusiasts.


Leave a Comment