
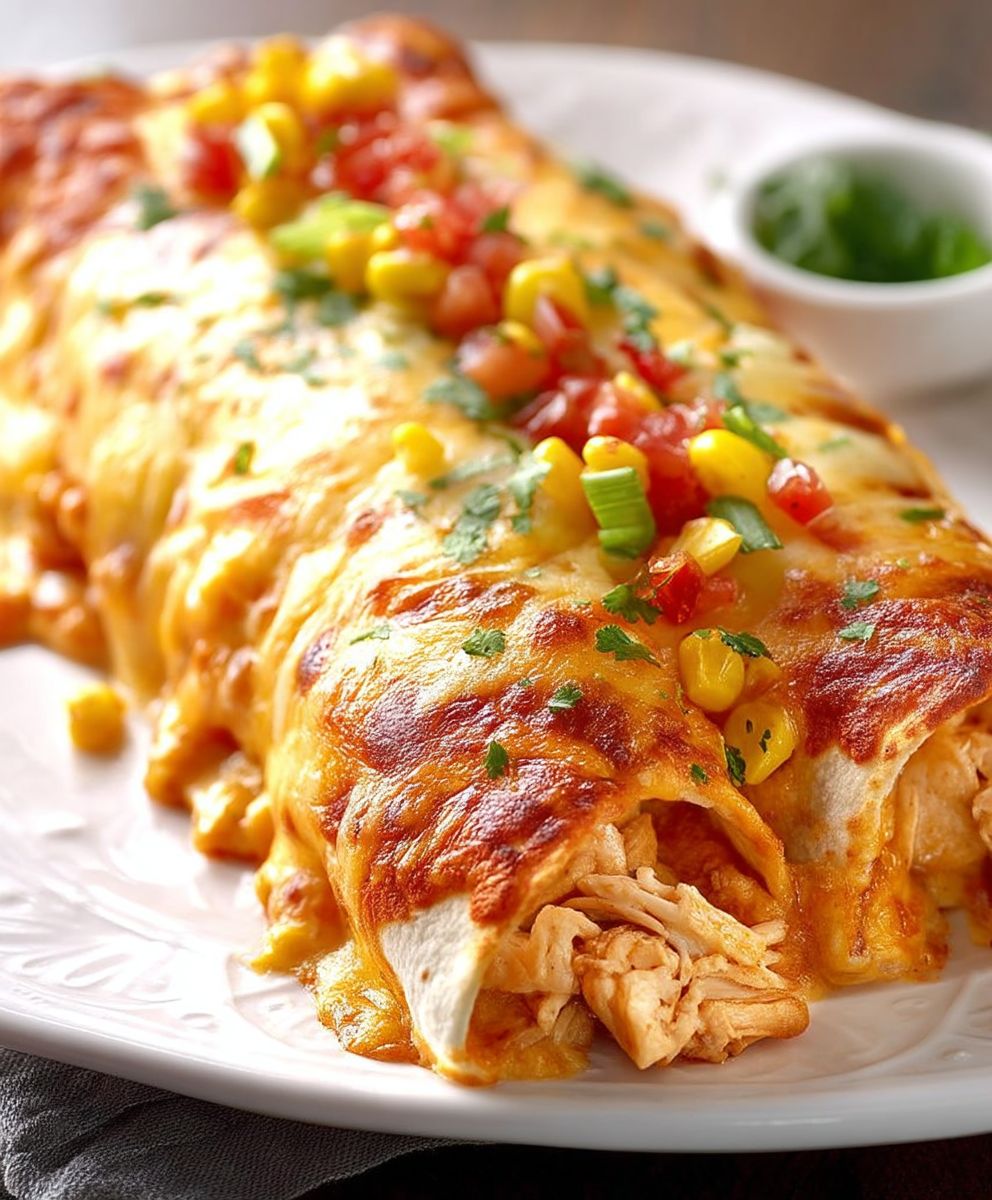
Imagine the aroma of savory chicken and vibrant spices mingling with the irresistible allure of melted cheese, all baked to golden perfection. This isn’t just a meal; it’s a warm hug for your taste buds, a culinary adventure that promises to transform an ordinary weeknight into a fiesta of flavor, especially with our incredible Creamy Queso Chicken Enchiladas. Get ready for a dish so comforting, it might just become your new favorite way to celebrate anything from Tuesday to triumph.
Why You’ll Adore These Enchiladas
- Effortless Preparation for Busy EveningsThis recipe simplifies the art of enchilada making, proving that gourmet flavors can be achieved without spending all day in the kitchen.
- Irresistible Layers of Creamy FlavorEach bite delivers a perfect harmony of tender chicken, robust seasonings, and rich, velvety queso sauce that truly delights.
- Visually Stunning and Appetizing PresentationGolden tortillas peeking through a bubbly, cheesy blanket make this dish a feast for the eyes before it even reaches your plate.
- Versatile for Any Occasion or PalateEasily adaptable to suit different preferences, these enchiladas are perfect for family dinners, potlucks, or even meal prepping for the week.
Ingredients for Creamy Queso Chicken Enchiladas
Here’s what you’ll need to make this delicious dish:
- Cooked Chicken BreastShredded into bite-sized pieces, this provides the hearty protein base for our enchiladas. You can use rotisserie chicken for extra convenience.
- Flour TortillasSoft and pliable, 8-inch flour tortillas are ideal for rolling and holding all the delicious fillings without tearing.
- Monterey Jack CheeseShredded, this cheese melts beautifully and offers a mild, creamy flavor that complements the queso perfectly.
- Cheddar CheeseShredded, adding a sharper, more pronounced cheesy flavor that balances the richness of the Monterey Jack.
- Olive OilA small amount is used to sauté aromatics and ensure even cooking, contributing a subtle richness.
- White OnionFinely diced, it provides a foundational aromatic flavor that sweetens and deepens when cooked.
- GarlicMinced, for an essential pungent and savory depth that enhances all the other flavors in the dish.
- Green ChilesDiced, these add a mild, earthy heat and authentic Southwestern flavor without being overly spicy.
- Chicken BrothLow sodium, this forms the liquid base for our creamy queso sauce, adding savory richness.
- MilkWhole milk or 2% milk works best, contributing to the luxurious creaminess and smooth texture of the queso.
- Cream CheeseSoftened, this is the secret ingredient for an ultra-creamy, tangy, and rich queso sauce that truly stands out.
- CuminGround, for its warm, earthy, and slightly pungent flavor, essential in Mexican-inspired cuisine.
- Chili PowderA blend of spices, it adds a robust, smoky, and mild heat profile to the filling and sauce.
- Smoked PaprikaFor a deep, smoky aroma and a beautiful reddish hue, enhancing the overall complexity of the flavors.
- Salt and Black PepperEssential seasonings to enhance all the individual flavors and bring them into harmonious balance.
- CilantroFresh, chopped, for a bright, herbaceous garnish that adds a refreshing contrast to the rich dish.
- Optional ToppingsSuch as sour cream or plain yogurt, extra green onions, or sliced avocado for added freshness and texture.
The full ingredients list, including measurements, is provided in the recipe card directly below.
How to Make Creamy Queso Chicken Enchiladas
Follow these simple steps to prepare this delicious dish:
Step 1: Prepare Your Ingredients and Preheat the Oven
Preheat your oven to 375°F (190°C). Spray a 9×13 inch baking dish generously with nonstick cooking spray. Shred your cooked chicken if you haven’t already. Grate both the Monterey Jack and cheddar cheeses, keeping them separate for now. Finely dice your white onion and mince the garlic.
Step 2: Build the Flavorful Chicken Filling
In a large skillet, heat a tablespoon of olive oil over medium heat. Add the diced white onion and cook until softened and translucent, about 5-7 minutes. Stir in the minced garlic and diced green chiles, cooking for another minute until fragrant. Add the shredded chicken, ground cumin, chili powder, and smoked paprika to the skillet. Stir everything together, ensuring the chicken is well coated with the spices. Cook for 2-3 minutes to allow the flavors to meld. Remove from heat and set aside.
Step 3: Craft the Velvety Queso Sauce
In the same skillet (no need to clean it!), melt the softened cream cheese over medium-low heat. Gradually whisk in the chicken broth and milk until the mixture is smooth and lump-free. Bring it to a gentle simmer, then reduce the heat to low. Stir in about half of the shredded Monterey Jack cheese and half of the shredded cheddar cheese until completely melted and the sauce is creamy. Season with salt and black pepper to taste. Keep the sauce warm on low heat.
Step 4: Assemble the Enchiladas
Dip each flour tortilla briefly into the warm queso sauce, just enough to make it pliable and slightly coated. Lay the tortilla flat on a clean surface. Spoon about 1/4 cup of the chicken filling down the center of each tortilla, then sprinkle with a little extra shredded cheese from the remaining half. Roll the tortilla up tightly and place it seam-side down in the prepared baking dish. Repeat with the remaining tortillas and filling until the dish is full.
Step 5: Bake to Golden Perfection
Pour the remaining creamy queso sauce evenly over the rolled enchiladas in the baking dish, ensuring they are all generously covered. Sprinkle the rest of the shredded Monterey Jack and cheddar cheeses over the top. Bake for 20-25 minutes, or until the cheese is bubbly and golden brown, and the enchiladas are heated through. For an extra golden crust, you can broil for the last 2-3 minutes, watching carefully to prevent burning.
Step 6: Garnish and Serve
Once out of the oven, let the Creamy Queso Chicken Enchiladas rest for 5-10 minutes before serving. This allows the sauce to set slightly and prevents them from falling apart. Garnish generously with fresh chopped cilantro. Transfer to plates and drizzle with extra warm queso sauce or a dollop of sour cream or plain yogurt for the perfect finishing touch.
The Story Behind My Love for Creamy Queso Chicken Enchiladas
Every home cook has that one dish that transports them back to a specific, cherished memory. For me, it’s the humble yet magnificent enchilada. I remember my first attempt at making enchiladas, a culinary escapade that involved more burnt edges and crumbling tortillas than actual edible portions. It was a disaster of epic proportions, a testament to my early kitchen clumsiness. My family, bless their hearts, pretended it was “rustic.” But the dream of perfect, gooey, comforting enchiladas never died. Years later, after much trial and error, a little bit of magic, and perhaps a secret conversation with a very wise chef, I finally perfected the art. The game-changer? A truly decadent, creamy queso sauce that blankets the chicken and cheese with a richness that is simply unparalleled. This recipe isn’t just about food; it’s about the journey, the laughs, and the triumphant moment when a dish finally sings. It’s about turning kitchen blunders into delicious victories, one cheesy, saucy bite at a time.
Tips for Making the Best Chicken Enchiladas
Crafting the perfect batch of enchiladas is an art, but these tips will ensure your Creamy Queso Chicken Enchiladas turn out spectacular every time. From ingredient selection to cooking techniques, every detail plays a role in achieving that restaurant-quality flavor and texture.
Choose the Right Chicken
While any cooked chicken works, using a rotisserie chicken or gently poached chicken breast can make a huge difference. Rotisserie chicken is already seasoned and incredibly tender, saving you prep time and adding a layer of flavor complexity that’s hard to beat. If poaching, make sure to season the water with aromatics like bay leaves and peppercorns for more flavorful results. Shred it against the grain for the most tender pieces.
Perfecting Your Queso Sauce Consistency
The key to a truly “creamy queso” lies in its texture. If your sauce feels too thick after adding the cheese, you can thin it out with a little more chicken broth or milk, a tablespoon at a time, until it reaches your desired consistency. Conversely, if it’s too thin, let it simmer gently for a few more minutes, stirring constantly, to allow it to reduce and thicken naturally. Remember to keep the heat low when adding cheese to prevent it from seizing or becoming grainy.
Don’t Overfill Your Tortillas
It’s tempting to cram as much delicious chicken and cheese into each tortilla as possible, but resist the urge! Overfilling can lead to tortillas that tear easily or enchiladas that burst open during baking. A modest 1/4 cup of filling per 8-inch tortilla is usually just right, allowing for a neat roll and even distribution of ingredients. This also ensures that each enchilada cooks evenly and remains intact.
Variations and Customizations for Your Enchiladas
One of the beautiful things about Creamy Queso Chicken Enchiladas is their incredible versatility. You can easily adapt this recipe to suit your dietary preferences or simply to try something new. Don’t be afraid to get creative in the kitchen!
Spice It Up or Tone It Down
If you love a little heat, consider adding a pinch of cayenne pepper or a dash of your favorite hot sauce to the chicken filling or the queso sauce. For a milder version, you can reduce the amount of green chiles or use only sweet bell peppers. Roasted red peppers can also add a smoky sweetness without any spice.
Vegetable Boosters
To sneak in more veggies, sauté some finely diced bell peppers, zucchini, or corn alongside the onions and garlic in the chicken filling. Spinach or black beans also make excellent additions. Simply wilt the spinach before adding it to the mixture, or drain and rinse the black beans thoroughly. These additions enhance nutritional value and add wonderful textures.
Cheese Lover’s Paradise
While Monterey Jack and cheddar provide a classic flavor, feel free to experiment with other cheeses. Pepper Jack can add a nice kick, while a blend of Mexican cheeses will enhance authenticity. A sprinkle of cotija cheese on top after baking can also add a salty, crumbly texture that contrasts beautifully with the creamy sauce.
Serving Suggestions for a Complete Meal
These Creamy Queso Chicken Enchiladas are hearty enough to be a meal on their own, but pairing them with a few simple sides can elevate the entire dining experience. Think about balancing the richness of the enchiladas with fresh, vibrant flavors. A crisp green salad with a zesty vinaigrette provides a refreshing contrast. For something more substantial, consider serving them alongside fluffy Mexican rice or a simple side of seasoned black beans. A bowl of freshly made guacamole and a vibrant tomato salsa will add an extra layer of freshness and color, making your meal feel like a true celebration. Don’t forget a squeeze of lime over the top right before serving to brighten all the flavors!
Storage and Reheating Instructions
If you’re lucky enough to have leftovers (a rare occurrence with these enchiladas!), proper storage ensures they remain just as delicious the next day. Allow the enchiladas to cool completely before transferring them to an airtight container. They will keep well in the refrigerator for up to 3-4 days. For reheating, you can warm individual portions in the microwave until heated through, or for a crispier result, reheat in an oven preheated to 350°F (175°C) for about 15-20 minutes, or until bubbly. If reheating in the oven, you might want to cover the dish with foil for the first part of the reheating to prevent drying out, then uncover for the last few minutes to crisp up the cheese. These enchiladas also freeze beautifully; simply wrap the cooled dish tightly in plastic wrap and then foil, and they’ll last for up to 3 months. Thaw in the refrigerator overnight before reheating.
Frequently Asked Questions About Creamy Queso Chicken Enchiladas
Can I prepare the enchiladas ahead of time?
Absolutely! You can assemble the Creamy Queso Chicken Enchiladas up to a day in advance. Simply cover the baking dish tightly with plastic wrap and refrigerate. When ready to bake, remove them from the refrigerator about 30 minutes before baking to allow them to come closer to room temperature, and then bake as directed, potentially adding an extra 5-10 minutes to the baking time.
What kind of chicken should I use for this recipe?
Cooked chicken breast is recommended, shredded or diced. Rotisserie chicken is a fantastic shortcut, offering tender, pre-seasoned meat. You can also boil or bake chicken breasts seasoned with salt, pepper, and garlic powder, then shred them yourself.
Can I make the queso sauce spicier?
Yes, to add more heat, you can incorporate a pinch of cayenne pepper, a dash of hot sauce like a jalapeño-based variety, or even finely diced fresh jalapeños or serrano peppers into the sauce while it simmers. Adjust according to your preferred spice level.
Are there any substitutions for cream cheese in the queso sauce?
While cream cheese is crucial for the signature creamy texture, you could try a blend of shredded American cheese and a touch of sour cream or plain yogurt for a similar creamy tang, though the flavor profile might vary slightly.
How do I prevent the tortillas from getting soggy?
Briefly dipping the tortillas in the warm queso sauce before filling and rolling helps them become pliable without becoming overly saturated. Also, ensuring your filling isn’t too wet and baking immediately after assembly can help prevent sogginess. A quick pan-fry of the tortillas in a tiny bit of oil (just a few seconds per side) can also create a barrier that resists moisture.
Embrace the Enchilada Magic
There you have it—a recipe for Creamy Queso Chicken Enchiladas that promises to bring joy, comfort, and a whole lot of cheesy goodness to your table. This dish isn’t just about satisfying hunger; it’s about creating an experience, a memory, and perhaps even a new family tradition. So, gather your ingredients, put on your favorite cooking playlist, and get ready to transform simple components into an extraordinary meal. The rich, creamy flavors, combined with the warmth of baked tortillas and savory chicken, are sure to make these enchiladas a stand-out hit. Prepare to impress, delight, and maybe even get a few standing ovations from your dinner guests. Happy cooking!
Perfecting the Cooking Process

Achieving enchilada nirvana demands a smart sequence. First, sear and shred your chicken, letting it cool slightly while you whisk together the vibrant red enchilada sauce. Then, while that simmers, craft your velvety queso. Finally, warm tortillas, assemble, and bake!
Add Your Touch
Feeling adventurous? Swap chicken for seasoned ground beef or tender lamb. Spice things up with a pinch of cayenne in the queso or a dash of chipotle powder in the red sauce. For a veggie kick, add roasted bell peppers or corn to the filling.
Storing & Reheating
Store leftover enchiladas covered tightly in the refrigerator for up to three days. For best results, reheat individual portions in the microwave until warm, or cover the entire dish with foil and bake at 350°F (175°C) until bubbly and heated through.
Chef’s Secret: Expert Tips for Your Enchiladas
- Don’t Skip Warming Tortillas:Briefly warming corn tortillas makes them pliable and prevents tearing when you roll, ensuring your enchiladas stay neatly tucked.
- Layer Flavors in Chicken:Season your shredded chicken generously before adding it to the tortillas; this foundational flavor boosts the entire dish’s deliciousness.
- Balance Your Sauces:Taste both your red enchilada sauce and queso sauce before assembling. Adjust seasonings to ensure a perfect harmony of savory and cheesy goodness.
Growing up, my grandmother would always say a good meal isn’t just food; it’s a hug. These enchiladas always brought our family together, filling the kitchen with laughter and making every gathering feel like a celebration of comfort.
There are certain dishes that just feel like home, wouldn’t you agree? For me, it’s a bubbling casserole dish, overflowing with the most decadent, cheesy, and utterly irresistible Creamy Queso Chicken Enchiladas. This isn’t just a meal; it’s a culinary journey to a happy place, a fiesta in your mouth that’s guaranteed to banish any lingering gloom. Imagine tender, seasoned chicken, lovingly wrapped in soft corn tortillas, all swimming in a rich, zesty red sauce and then drowned in a velvety, dreamy queso. It’s the kind of dish that makes you close your eyes, hum a little happy tune, and consider asking for a second (or third) helping before you’ve even finished the first. My friends often joke that my kitchen turns into a high-stakes enchilada factory when I get going, but honestly, the payoff is always worth it.
Unveiling the Magic: Creamy Queso Chicken Enchiladas
Forget everything you thought you knew about comfort food. These Creamy Queso Chicken Enchiladas elevate the concept to an art form. We’re talking about layers of flavor that build into an epic symphony of taste. First, the savory, perfectly spiced chicken filling dances with the earthy corn tortillas. Then comes the vibrant, tangy embrace of a homemade red enchilada sauce, bubbling with aromatic spices. And finally, the grand finale: a luscious, creamy queso, rich with cheeses and just a hint of green chilies, melting over everything to create a golden, gooey crust. This dish is designed to be devoured, celebrated, and added to your weekly rotation faster than you can say “more please!”
Gather Your Culinary Army: Ingredients List
Before we embark on this delicious adventure, gather your ingredients. Think of them as your culinary toolkit, ready to transform into pure enchilada gold. Having everything prepped makes the process smooth and enjoyable, saving you from a last-minute scramble.
- For the Chicken Filling:
- 2 tablespoons vegetable oil
- 1.5 pounds boneless, skinless chicken breasts or thighs, cooked and shredded
- 1 teaspoon chili powder
- 0.5 teaspoon ground cumin
- 0.25 teaspoon garlic powder
- Salt and black pepper to taste
- For the Zesty Red Enchilada Sauce:
- 2 tablespoons vegetable oil
- 2 tablespoons all-purpose flour
- 2 cups chicken broth
- 1 (8 ounce) can tomato sauce
- 2 tablespoons chili powder
- 1 teaspoon ground cumin
- 0.5 teaspoon dried oregano
- 0.25 teaspoon garlic powder
- Salt to taste
- For the Creamy Queso Sauce:
- 2 tablespoons unsalted butter
- 2 tablespoons all-purpose flour
- 2 cups whole milk
- 4 ounces cream cheese, softened and cut into cubes
- 1 cup shredded sharp cheddar cheese
- 1 cup shredded Monterey Jack cheese
- 1 (4 ounce) can diced green chilies, undrained
- Salt and white pepper to taste
- For Assembly:
- 12-15 corn tortillas
- 1 cup shredded Monterey Jack cheese (for topping)
- Optional Garnishes:
- Fresh cilantro, chopped
- Diced red onion
- Sliced avocado or guacamole
- Sour cream or a non-dairy alternative
The Grand Adventure: Step-by-Step Enchilada Creation
Now that our ingredients are standing by, let’s bring these amazing Creamy Queso Chicken Enchiladas to life. Don’t be intimidated; each step is straightforward and incredibly rewarding. Get ready to impress yourself!
Step 1: Prep Your Poultry Powerhouse
Heat 2 tablespoons of vegetable oil in a large skillet over medium heat. Add your cooked, shredded chicken. Season it with chili powder, cumin, garlic powder, salt, and pepper. Toss until well combined and heated through. Remove the chicken from the skillet and set aside in a bowl.
Step 2: Crafting the Zesty Enchilada Sauce
In the same skillet, heat 2 tablespoons of vegetable oil over medium heat. Whisk in 2 tablespoons of flour and cook for 1 minute, creating a roux. Gradually whisk in the chicken broth and tomato sauce until smooth. Stir in the chili powder, cumin, oregano, and garlic powder. Bring to a simmer, reduce heat, and cook for 10-15 minutes, stirring occasionally, until the sauce thickens slightly. Season with salt to taste. This vibrant sauce forms the heart of your enchiladas.
Step 3: Conjuring the Creamy Queso Sauce
In a separate saucepan, melt 2 tablespoons of butter over medium heat. Whisk in 2 tablespoons of flour and cook for 1 minute. Slowly whisk in the milk until smooth, cooking until it thickens slightly, about 3-5 minutes. Reduce heat to low, then stir in the softened cream cheese until fully melted and smooth. Gradually add the shredded cheddar and Monterey Jack cheeses, stirring constantly until melted and creamy. Stir in the diced green chilies. Season with salt and white pepper. Keep warm.
Step 4: The Art of the Roll
Preheat your oven to 375°F (190°C). Lightly grease a 9×13 inch baking dish. Briefly warm your corn tortillas in a dry skillet or microwave to make them pliable. Dip each tortilla into the red enchilada sauce, coating both sides. Place about 2-3 tablespoons of the seasoned chicken filling down the center of each tortilla, then roll it up tightly. Arrange the rolled tortillas seam-side down in your prepared baking dish.
Step 5: The Grand Finale Bake
Once all the enchiladas are neatly arranged, pour any remaining red enchilada sauce over them. Next, generously smother the entire dish with your creamy queso sauce. Sprinkle the remaining 1 cup of shredded Monterey Jack cheese over the top. Bake for 20-25 minutes, or until the enchiladas are bubbling around the edges and the cheese on top is melted and lightly golden. Let them rest for a few minutes before serving.
Serving Your Scrumptious Creamy Queso Chicken Enchiladas
The moment of truth! Carefully remove your bubbling dish of Creamy Queso Chicken Enchiladas from the oven. Let them cool for a few minutes to allow the sauces to set slightly—this makes serving much easier (and prevents scorched tongues, a common rookie mistake!). Serve immediately, garnished with fresh cilantro, diced red onion, or a dollop of sour cream. These enchiladas are a complete meal on their own, but they also pair wonderfully with a simple green salad or some fluffy rice.
Frequently Asked Questions About These Delightful Enchiladas
Can I make Creamy Queso Chicken Enchiladas ahead of time?
Absolutely! You can assemble the enchiladas (up to the point of baking) and store them covered in the refrigerator for up to 24 hours. Add the top layer of cheese right before baking. You might need to add an extra 5-10 minutes to the baking time if baking from cold.
What if I don’t have corn tortillas?
While corn tortillas are traditional and provide a wonderful flavor, you can certainly use flour tortillas as an alternative. Just be aware they tend to absorb less sauce, so your dish might be slightly less saucy, but still delicious.
How can I make the enchilada sauce spicier?
To add more kick, incorporate a pinch of cayenne pepper into the red enchilada sauce or a dash of your favorite hot sauce into the queso. You could also mix finely diced jalapeños (fresh or canned) into the chicken filling for an extra layer of heat.
Why These Creamy Queso Chicken Enchiladas Will Become Your Family’s Favorite
This recipe for Creamy Queso Chicken Enchiladas isn’t just about following steps; it’s about creating an experience. It’s about bringing smiles to faces, satisfying the deepest comfort food cravings, and making memories around the dinner table. So, go ahead, gather your ingredients, unleash your inner chef, and prepare for a standing ovation. These enchiladas are destined to be a beloved staple in your home, proving that the best meals are always made with a generous sprinkle of love and a whole lot of delicious cheese!
Conclusion for Creamy Queso Chicken Enchiladas
There you have it – the secret to unlocking a dish that brings smiles, satisfied sighs, and perhaps even a happy dance or two! These Creamy Queso Chicken Enchiladas are more than just a meal; they’re an experience, a symphony of tender chicken, velvety queso, and warm tortillas that come together in a hug of flavor. We’ve explored how simple it is to whip up this crowd-pleaser, offering tips to customize it to your heart’s content. So, gather your ingredients, channel your inner culinary maestro, and prepare to delight everyone at your table with this unforgettable, cheesy masterpiece. Happy cooking!
Print
Creamy Queso Chicken Enchiladas
- Total Time: 35 minutes
- Yield: 4 servings 1x
Description
Dive into Creamy Queso Chicken Enchiladas! Shredded chicken and cream cheese fill tortillas, smothered in a dreamy Velveeta & green chile sauce. Oven-baked for perfection.
Ingredients
- 2 cups cooked chicken, shredded
- 8–10 (8-inch) flour tortillas
- 16 oz Velveeta or queso blanco, cubed
- 1/2 cup milk
- 4 oz cream cheese, softened
- 1 (4 oz) can diced green chiles, undrained
- 1 (19 oz) can red or green enchilada sauce
- 1 cup shredded Monterey Jack or Mexican blend cheese
Instructions
- Step 1: Preheat your oven to 375°F (190°C). Lightly grease a 9×13 inch baking dish. In a medium bowl, combine the shredded chicken, softened cream cheese, and half of the can of diced green chiles. Mix until well combined.
- Step 2: In a medium saucepan over low heat, combine the cubed Velveeta or queso blanco, milk, and the remaining half of the diced green chiles. Stir frequently until the cheese is completely melted and the sauce is smooth and creamy.
- Step 3: Lay out each flour tortilla. Spoon about 1/4 to 1/3 cup of the chicken mixture down the center of each tortilla, then roll it up tightly. Place the rolled enchiladas seam-side down in the prepared baking dish until all tortillas are used.
- Step 4: Pour the entire can of enchilada sauce evenly over the rolled enchiladas. Next, pour the creamy queso sauce you prepared in Step 2 over the top of the enchiladas, ensuring good coverage. Finally, sprinkle the shredded Monterey Jack or Mexican blend cheese over everything.
- Step 5: Bake for 20-25 minutes, or until the cheese is melted and bubbly and the enchiladas are heated through. If desired, broil for the last 2-3 minutes to get a golden-brown top, watching carefully to prevent burning. Let stand for 5 minutes before serving.
Notes
- Store any leftover enchiladas tightly covered in the refrigerator for up to 3 days; they make a fantastic quick lunch!
- For best results, reheat individual portions in the microwave until warm, or cover and warm the entire dish in the oven at 300°F (150°C) until bubbly to keep them from drying out.
- Serve these rich enchiladas with a dollop of sour cream or a sprinkle of fresh cilantro, alongside a simple green salad or some zesty Mexican rice to complete your meal.
- Warm your flour tortillas briefly in the microwave or a dry skillet before rolling; it makes them much more pliable and prevents tearing when filling.
- Prep Time: 15 minutes
- Cook Time: 20 minutes
- Method: Stovetop
- Cuisine: American
Nutrition
- Serving Size: 2 enchiladas
- Calories: 800
- Sodium: 1850mg
- Fat: 58g
- Saturated Fat: 28g
- Trans Fat: 0.5g
- Protein: 7g
FAQs
How can I adjust the spice level in Creamy Queso Chicken Enchiladas?
If you prefer a milder kick in your Creamy Queso Chicken Enchiladas, simply reduce the amount of jalapeños or omit them entirely from the queso sauce. You can also use a mild green chili instead of a hotter variety for a gentler flavor. For a touch of warmth without the intense heat, try adding a pinch of smoked paprika. Remember, the beauty of homemade enchiladas is tailoring them to your exact preference, so feel free to experiment until you find your perfect balance of flavor and spice. It’s all about making your taste buds happy!
Can I prepare these delightful enchiladas ahead of time?
Absolutely! Preparing your enchiladas in advance is a fantastic way to streamline dinner, making weeknight meals a breeze. You can assemble them, place them in your baking dish, and cover tightly with foil or plastic wrap. Refrigerate for up to 24 hours. When you’re ready to bake, simply let them sit at room temperature for about 20-30 minutes before popping them into the oven. You might need to add an extra 5-10 minutes to the baking time if they’re still quite cold. This pre-prep method makes hosting easy and stress-free!
What are the best side dishes to serve with Creamy Queso Chicken Enchiladas?
Creamy Queso Chicken Enchiladas are incredibly rich and flavorful, so pairing them with fresh, lighter sides creates a delightful contrast. A simple Mexican rice, seasoned with a squeeze of lime, or a vibrant corn and black bean salad makes an excellent companion. For something even lighter, a crisp green salad with a zesty vinaigrette can cut through the richness beautifully. Don’t forget a dollop of sour cream or a sprinkle of fresh cilantro on top of your enchiladas for an extra burst of freshness and a perfect finish to your meal!
What kind of chicken is best for these enchiladas?
For the juiciest and most flavorful enchiladas, we recommend using cooked chicken breast or thighs. Shredded rotisserie chicken is a fantastic shortcut, offering tender, pre-seasoned meat that saves you prep time and adds a layer of depth. If cooking from scratch, poach or bake boneless, skinless chicken until cooked through, then shred it finely. The key is to have tender, easily shreddable chicken that can effortlessly mix with the sauce and fillings, ensuring every bite is packed with deliciousness. Avoid overly dry chicken for the best texture!


Leave a Comment