
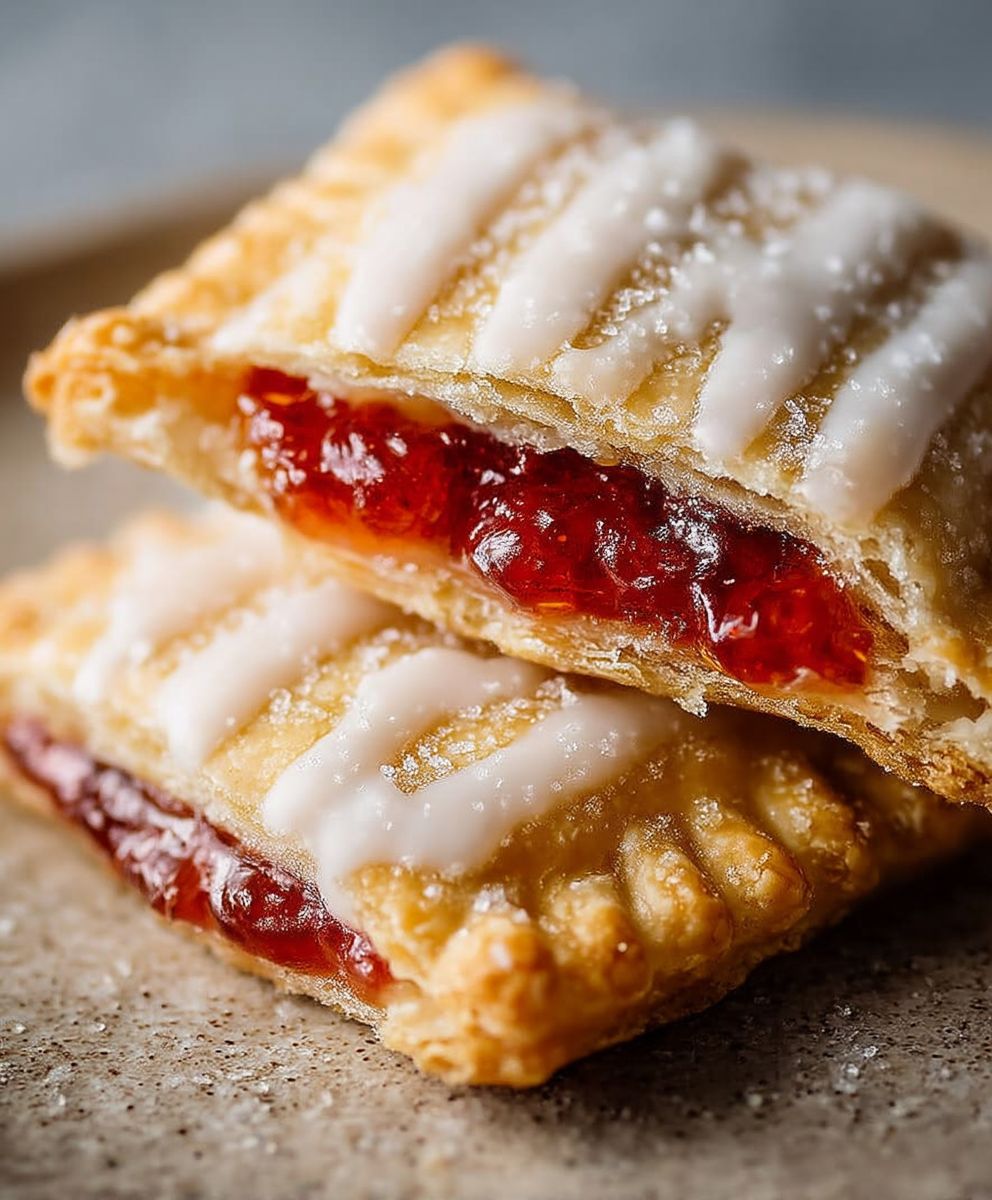
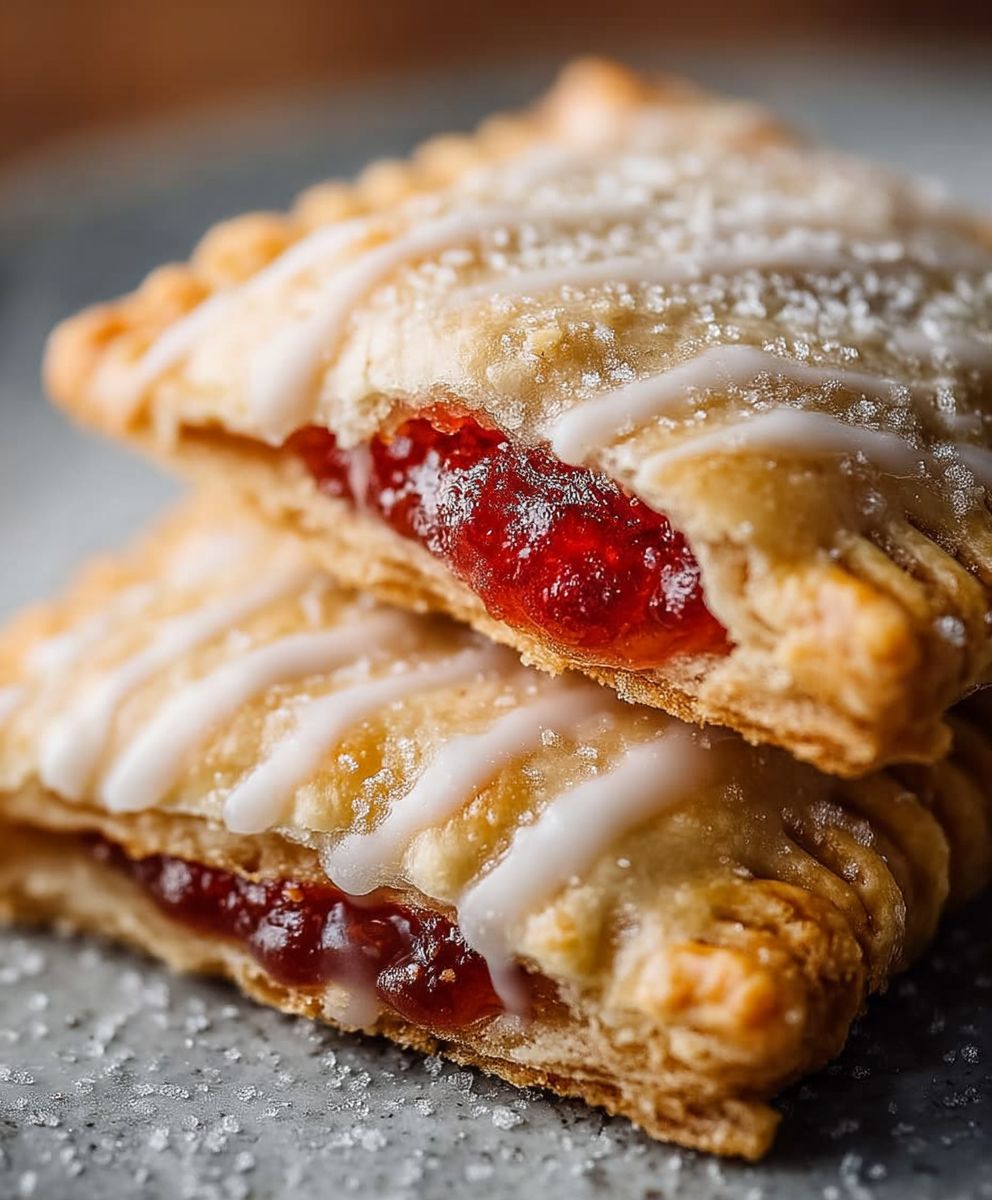
Forget the foil packets and the vague fruit filling of your childhood. We are talking about flaky, tangy, bakery-quality pastries that just happen to fit in your toaster. TheseHomemade Sourdough Pop Tarts With Jam Fillingare the ultimate nostalgic upgrade, offering a sophisticated twist on a beloved classic breakfast. The scent of warm vanilla and fermented dough filling your kitchen is pure magic. Get ready to transform your morning routine from basic to blissful—no toaster dust required, only delicious, handcrafted perfection.
- The distinct, subtle tang of the sourdough crust perfectly balances the sweet burst of the vibrant jam filling, creating complex breakfast bliss.
- Utilizing discarded or active sourdough starter makes the pastry dough incredibly flaky and adds depth without requiring excessive rising time.
- These customizable treats boast a thick layer of frosting and colorful sprinkles, making them infinitely more appealing than their commercial counterparts.
- Easily adapt this base recipe using seasonal fruit preserves or chocolate spreads, ensuring year-round, bakery-fresh enjoyment.
The Unexpected Brilliance of Sourdough Pastry
If you are anything like me, your sourdough journey started during a period of intense home-based boredom, resulting in 80% success and 20% flat, dense failures that you lovingly called “rustic.” The sourdough starter is a demanding mistress, requiring frequent feeding, endless monitoring, and a seemingly bottomless waste bin for the discard. But fear not, my fellow bakers! That excess discard—the stuff you usually feel guilty throwing out—is the secret weapon for creating the flakiest, most tender pastry shell imaginable for these glorious tarts.
Traditional pastry relies purely on cold butter and precise technique. Sourdough discard, however, introduces a layer of fermentation flavor and acid that works wonders on the gluten structure. It inhibits the dough from becoming tough while adding that fantastic, complex tang that prevents the finished product from tasting overly sweet. When people ask you how your tarts are so much better than the store-bought versions, you can simply nod knowingly and whisper, “It’s the wild yeast, darling.” This recipe is so satisfying because it feels like redemption; you’re not just making breakfast, you’re utilizing every drop of that fussy starter you’ve spent months cultivating. The joy of turning potential food waste into a gourmet breakfast treat is truly unparalleled, and the results are utterly transformative.
Mastering the Sourdough Pastry Dough
While the process is straightforward, the key to success lies in keeping everything cold. We are aiming for layers of buttery goodness, not a sticky, uniform mess. The colder the ingredients, especially the butter and the sourdough starter, the better the final texture will be. If your kitchen runs warm, consider chilling your mixing bowl and even your flour before starting. When mixing the dough, stop the moment it comes together; overmixing is the enemy of flaky pastry. You want to see visible chunks of butter still integrated into the dough—these pockets are what create the steam and lift during baking, giving you that iconic, shattering crust.
After mixing, the dough absolutely requires a proper rest in the refrigerator. This isn’t just a suggestion; it’s mandatory. This chill time allows the gluten strands, which were activated during mixing, to relax, making the dough much easier to roll out evenly without snapping back at you. A well-rested dough also contributes significantly to the tenderness of the crust. Plan for at least two hours of chilling time, though overnight is even better. Think of it as mandatory beauty rest for your breakfast treats. When it comes time to roll, remember precision matters, especially since you need two perfectly matched rectangles for each tart. Use a ruler if necessary—theseHomemade Sourdough Pop Tarts With Jam Fillingdeserve nothing less than geometric perfection.
Ingredients for Homemade Sourdough Pop Tarts With Jam Filling
Here’s what you’ll need to make this delicious dish:
- All-Purpose FlourUse a good quality, unbleached flour, ensuring it is chilled if your kitchen is particularly warm.
- Cold Unsalted ButterCut into small cubes and kept extremely cold; this provides the necessary fat and creates the flakiness in the pastry.
- Sourdough Starter Discard or Active StarterThis provides the subtle tang and helps tenderize the dough; use starter that has not been fed recently for the most pronounced flavor.
- Granulated SugarEssential for balancing the acidity of the sourdough and adding just enough sweetness to the crust.
- SaltA necessary counterpoint to the sweetness, ensuring the flavor profile of the dough is well-rounded and complex.
- Ice WaterUsed sparingly to bring the dough together; the less water used, the more tender the final crust will be.
- Fruit Jam or PreservesChoose a high-quality jam with a thick consistency; avoid runny jellies, as they are likely to bubble out during baking.
- Powdered Sugar and Milk/Alcohol-Free Vanilla Extract (for Glaze)Combined to create a simple, luxurious glaze that sets beautifully once the tarts are cooled.
The full ingredients list, including measurements, is provided in the recipe card directly below.
How to Make Homemade Sourdough Pop Tarts With Jam Filling
Follow these simple steps to prepare this delicious dish:
Step 1: Preparing the Sourdough Pastry Dough
In a large bowl, whisk together the flour, sugar, and salt. Cut in the cold butter using a pastry blender or your fingertips until the mixture resembles coarse crumbs with some larger, pea-sized pieces remaining. Incorporate the sourdough starter and then drizzle in the ice water, one tablespoon at a time, mixing until the dough just barely comes together. Do not overmix. Flatten the dough into a thick disk, wrap it tightly in plastic, and refrigerate for a minimum of two hours, or ideally, overnight.
Step 2: Rolling and Cutting the Tart Shells
Preheat your oven to 350°F (175°C). Line two large baking sheets with parchment paper. Divide the chilled dough in half and roll out one half on a lightly floured surface to a rectangle approximately 1/8 inch thick. Using a sharp knife or pizza cutter, cut the dough into eight equal rectangles, roughly 4 x 3 inches in size. Repeat this process with the second half of the dough, yielding 16 total rectangles.
Step 3: Filling and Sealing the Tarts
Place eight of the dough rectangles onto the prepared baking sheets. Scoop about 1 to 1.5 teaspoons of your chosen thick jam onto the center of each rectangle, leaving a half-inch border completely clear. Avoid overfilling, as excess jam will leak out and make sealing difficult. Brush the edges of the bottom pastry with a little water, then carefully place the remaining eight rectangles on top, matching the edges exactly. Gently press down on the perimeter to seal the edges.
Step 4: Crimping and Venting
Use the tines of a fork to firmly crimp all four sides of each tart, ensuring a tight seal that prevents the jam from escaping during the baking process. Once sealed, use a skewer or the fork to poke three small vent holes directly into the top of each tart. These vents allow steam to escape, preventing the pastry from puffing up unevenly. For a golden finish, lightly brush the tops of the tarts with a tiny bit of milk or a beaten egg wash, though this step is optional.
Step 5: Baking the Sourdough Pop Tarts
Bake the tarts for 20 to 25 minutes, rotating the sheets halfway through, until the crust is beautifully golden brown and firm to the touch. Remove the baking sheets from the oven and carefully slide the parchment paper onto cooling racks. Allow the tarts to cool completely—this is crucial—before applying the glaze, otherwise the glaze will simply melt and run off.
Step 6: Glazing and Serving
While the tarts cool, whisk together the powdered sugar, a splash of milk, and a tiny bit of alcohol-free vanilla extract until you achieve a thick but pourable glaze consistency. If the glaze is too thin, add more powdered sugar; if too thick, add a drop more milk. Once the tarts are completely cool, drizzle or spread the glaze generously over the tops. Add sprinkles or decorative sugar immediately while the glaze is still wet. Allow the glaze to set for about 15 minutes before serving. Transfer to plates and drizzle with sauce for the perfect finishing touch, or simply enjoy these gourmet treats straight off the cooling rack.
The Accidental Discovery of Sunshine on a Plate
My sourdough starter, ‘Jeff Goldblum,’ usually makes decent bread, but one sleepy Sunday, I accidentally rolled the discard paper-thin. Instead of tossing it, I smeared strawberry jam on one half, sealed it up, and baked it. The result? A flakey, tangy, unbelievably wonderful treat that tasted like pure childhood nostalgia.
There are days in the kitchen when everything feels like a chore, and then there are the glorious, chaotic days that gift you culinary brilliance. This recipe forHomemade Sourdough Pop Tarts With Jam Fillingwas born directly from the latter experience, proving that sometimes, the best food discoveries happen when you are simply trying to clean out your refrigerator. I had a mountain of sourdough discard—the kind that silently judges you from the back of the shelf—and a nagging sense that throwing it away would be a crime against fermentation. What followed was a highly scientific process involving rolling, jamming, sealing, and hoping for the best. What emerged from the oven was a pastry that redefined breakfast: flaky, perfectly sweet, and boasting that subtle, irresistible sourdough tang that elevates everything it touches. Forget the sad, dusty boxed versions of your youth; these are the gourmet, adult upgrade your mornings deserve.
The Magic of Sourdough Discard in Pastry
Using sourdough discard in pastry dough isn’t just a clever way to reduce food waste; it fundamentally improves the final product. Unlike traditional shortcrust or pie dough, the discard adds complexity and tenderness. The inherent acidity in the discard inhibits gluten development, resulting in an exceptionally tender crumb that practically melts in your mouth. Furthermore, you get that deep, yeasty, slightly sour flavor that balances the sweetness of the fruit jam perfectly. We are skipping the proofing stage entirely here; the discard acts purely as a flavor and texture enhancer, not a primary leavening agent. This means faster prep time, which is always a win when you are aiming for quick breakfast treats.
Perfecting the Cooking Process
The secret to these handheld masterpieces is efficiency. First, prepare your jam filling and icing. Then, roll the dough, cut the rectangles, fill quickly, and seal them tightly using a fork. Chilling them before baking ensures they hold their shape perfectly and achieve maximum flakiness.
Gathering Your Sourdough Pop Tart Essentials
The ingredients for these delicious pastries are delightfully straightforward, assuming you already have a bustling sourdough starter named Jeff or maybe Brenda. Quality ingredients make a huge difference, especially when choosing the fruit filling. Look for high-quality, thick preserves rather than runny jelly. If the jam is too liquid, it tends to boil out during baking, leading to sticky, explosive leaks that ruin the pastry integrity and make your oven miserable. We want joyful fruit pockets, not sticky jam catastrophes.
Ingredients for the Sourdough Pastry
- 2 cups (500g) Sourdough Discard (unfed, 100% hydration)
- 2 cups (240g) All-Purpose Flour, plus extra for dusting
- 1 cup (225g) unsalted butter, very cold and cubed
- 1/4 cup (50g) Granulated Sugar
- 1 teaspoon Salt
- 1/4 cup Ice Water
- 1 large egg, beaten (for egg wash)
Ingredients for the Jam Filling and Glaze
- 1 cup thick fruit jam (strawberry, raspberry, or blueberry recommended)
- 2 tablespoons cornstarch (if jam is thin)
- 2 cups Powdered Sugar
- 3-4 tablespoons milk (or non-dairy alternative)
- 1 teaspoon alcohol-free vanilla extract
- Optional: Sprinkles!
Crafting the Flaky Sourdough Crust
The foundation of a great tart is a great crust. Start by combining the cold butter, flour, sugar, and salt in a large bowl. Using a pastry blender or your fingertips, cut the butter into the dry ingredients until the mixture resembles coarse crumbs with some pea-sized chunks of butter remaining. Those butter chunks are crucial; they are what create the steam and resulting layers during baking. Next, incorporate the sourdough discard. It will feel sticky, but that’s normal. Gradually add the ice water, a tablespoon at a time, until the dough just comes together. Do not overwork the dough; we want a tender crust, not a rubbery one. Form the dough into two discs, wrap them tightly in plastic wrap, and chill them in the refrigerator for at least one hour.
Assembly and Baking Instructions
Once chilled, the dough becomes much easier to handle. Preheat your oven to 375°F (190°C) and line two baking sheets with parchment paper. Lightly flour your work surface and roll one disc of dough into a rectangle roughly 1/8 inch thick. Using a pizza cutter or sharp knife, cut the dough into equal rectangles, approximately 3 inches by 4 inches. You should yield about 18 to 20 rectangles total.
Lay half the rectangles onto the prepared baking sheets. If your jam is runny, whisk in a tablespoon or two of cornstarch to thicken it slightly before use. Place one generous tablespoon of jam filling in the center of each rectangle, leaving a half-inch border around the edges. Brush the edges with the beaten egg wash. Top each filled piece with a corresponding pastry rectangle. Press the edges firmly with your fingers, then use the tines of a fork to crimp all four sides shut. This creates that signature look and, more importantly, prevents filling leakage.
Brush the tops of the assembled pastries lightly with the remaining egg wash. If you want extra flaky results, place the baking sheets back into the freezer for 15 minutes before baking. Bake for 18 to 22 minutes, or until the pastries are beautifully golden brown and the edges look fully sealed. Let them cool completely on the baking sheet before moving on to the glazing step.
Add Your Touch
Get creative with the filling! Swap out store-bought jam for homemade apple butter or even a tangy lemon curd. For a spiced twist, add a pinch of cardamom to the dough, or replace alcohol-free vanilla extract in the icing with alcohol-free almond extract for a marzipan-like finish.
The Grand Finale: Glaze and Decoration
While the pastries are cooling, whisk together the powdered sugar, milk, and alcohol-free vanilla extract until you achieve a smooth, pourable but still thick consistency. If you prefer a thinner glaze, add a few more drops of milk. Once the homemade sourdough pop tarts are cool—and patience is key here, or the glaze will melt right off—drizzle or spread the glaze generously across the tops. This is the moment to unleash your inner child: add those optional sprinkles before the glaze sets. The final product is a perfect handheld snack that carries the sophisticated flavor profile only sourdough can offer.
Storing & Reheating
Store these finished pastries in an airtight container at room temperature for up to three days, or refrigerate for up to five days. To refresh, pop them into a toaster oven for a few minutes until the pastry crust crisps up again. Avoid microwaving, as it makes them soggy.
Expert Tips for Perfect Pastries
- When sealing the edges, lightly dip your fork in flour to prevent sticking, ensuring a tight seal that locks the sweet jam filling inside during baking.
- Don’t be afraid of a little browning! That deep golden color means the sourdough crust is fully cooked and developed that incredible signature tang.
- If your sourdough discard is very wet, add a tablespoon of flour at a time until it reaches a manageable, non-sticky consistency suitable for rolling out easily.
My neighbor, who usually only eats kale chips, devoured three of these pastries and then asked if I offered weekly sourdough subscription services. That’s how you know they are truly amazing.
Conclusion for Homemade Sourdough Pop Tarts With Jam Filling
Embracing the tangy complexity of sourdough discard transforms a simple breakfast pastry into something truly special. We have covered the essential steps, from rolling out the perfect flaky crust to creating a vibrant jam filling that bursts with flavor. Remember the key is a tight seal and proper chilling time to maintain the structure of these delightful treats. Whether you use strawberry, blueberry, or even spiced apple filling, mastering these Homemade Sourdough Pop Tarts With Jam Filling ensures you always have a taste of gourmet nostalgia waiting. They prove that sometimes, the best recipes come from happy kitchen accidents.
Print
Homemade Sourdough Pop Tarts With Jam Filling
- Total Time: 35 minutes
- Yield: 4 servings
Description
Elevate breakfast! These Sourdough Pop Tarts use cold butter and discard for an exceptionally flaky, tangy crust paired with sweet jam. Full recipe instructions and detailed nutrition facts provided.
Ingredients
- All-purpose flour: 2 cups
- Cold unsalted butter: 1 cup (2 sticks), cubed
- Sourdough discard (unfed): 1/2 cup
- Granulated sugar: 2 tablespoons (for the dough)
- Salt: 1 teaspoon
- Jam (e.g., strawberry or raspberry): 1/2 cup
- Powdered sugar: 1 cup (for the glaze)
- Milk or cream: 2 tablespoons (for the glaze)
Instructions
- Step 1: Combine the flour, granulated sugar, and salt in a large bowl or food processor. Cut in the cold butter until the mixture resembles coarse crumbs. Add the sourdough discard and mix until the dough just comes together. Form the dough into a flat disc, wrap tightly in plastic, and chill in the refrigerator for at least 1 hour.
- Step 2: Preheat your oven to 375°F (190°C) and line a baking sheet with parchment paper. Roll the chilled dough out to about 1/8-inch thickness. Using a sharp knife or pizza cutter, cut the dough into uniform 3×4 inch rectangles (you will need pairs for each tart).
- Step 3: Place 1 tablespoon of jam filling in the center of half the rectangles, ensuring a 1/2 inch border is clear. Place a corresponding dough rectangle on top, pressing the edges together. Use the tines of a fork to firmly crimp and seal all four sides of each tart, and then use a toothpick or fork to poke 3-4 holes (dock) in the top surface to allow steam to escape.
- Step 4: Transfer the assembled pop tarts to the prepared baking sheet. Bake for 18 to 22 minutes, or until the crust is pale golden brown and feels firm. Allow the tarts to cool completely on a wire rack before glazing.
- Step 5: While the tarts cool, prepare the glaze by whisking together the powdered sugar and milk/cream until smooth and pourable. Drizzle or spread the glaze evenly over the cooled pop tarts. Allow the glaze to set for 15-20 minutes before serving.
Notes
- Store these treats in an airtight container at room temperature for up to 3 days, or refrigerate for longer freshness, noting the glaze might soften slightly when cold.
- If you need to reheat, use a toaster oven or bake at 300°F for 5-8 minutes; avoid microwaving, which will compromise the buttery flakiness of the sourdough crust.
- Ensure you firmly crimp and dock (poke holes) each tart before baking; this is crucial for sealing the jam and allowing steam to escape, preventing catastrophic bursts.
- Elevate the experience by serving these warm alongside a mug of coffee or tea, or pair them with vanilla bean ice cream for a superior dessert presentation.
- Prep Time: 15 minutes
- Cook Time: 20 minutes
- Method: Stovetop
- Cuisine: American
Nutrition
- Serving Size: 1 Homemade Sourdough Pop Tart (approx. 115g)
- Calories: 510
- Sodium: 280mg
- Fat: 28g
- Saturated Fat: 15g
- Trans Fat: 0g
- Protein: 38g


Leave a Comment